Tutorial: Get started with RiotBlossom using ASP.NET Core and Visual Studio
This razor-sharp tutorial will show you how to install RiotBlossom and make a request to the Riot Games API using ASP.NET Core and Visual Studio!
You will learn how to:
- Create an ASP.NET Core Web API project
- Setup RiotBlossom
- Configuring services with dependency injection
- Edit a Razor page
- Fetching data from
summoner-v4 - Run the app
Prerequisites
- .NET 6.0 SDK
- Visual Studio 2022 with ASP.NET and web development workloads
- Riot Games development API key
- Riot Games Developer Policies
- Riot Games Developer Portal Documentation
Create an ASP.NET Core Web API project
Open Visual Studio 2022 and select Create a new project:
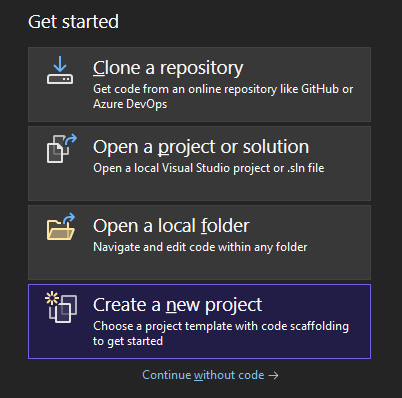
You will be given project templates to start from. Select the ASP.NET Core Web App project template:
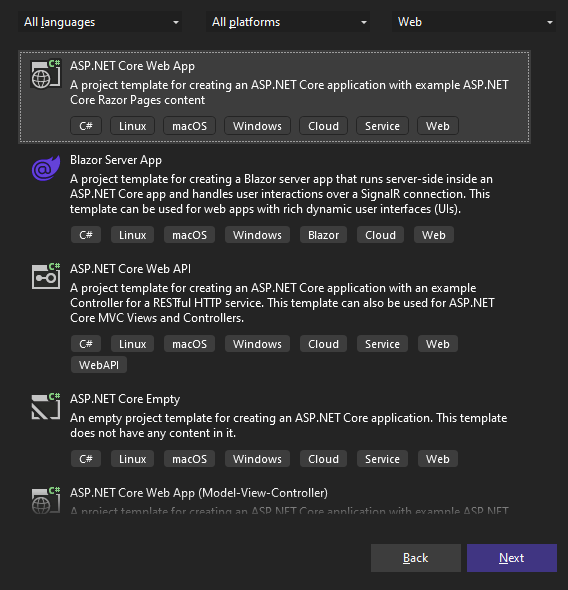
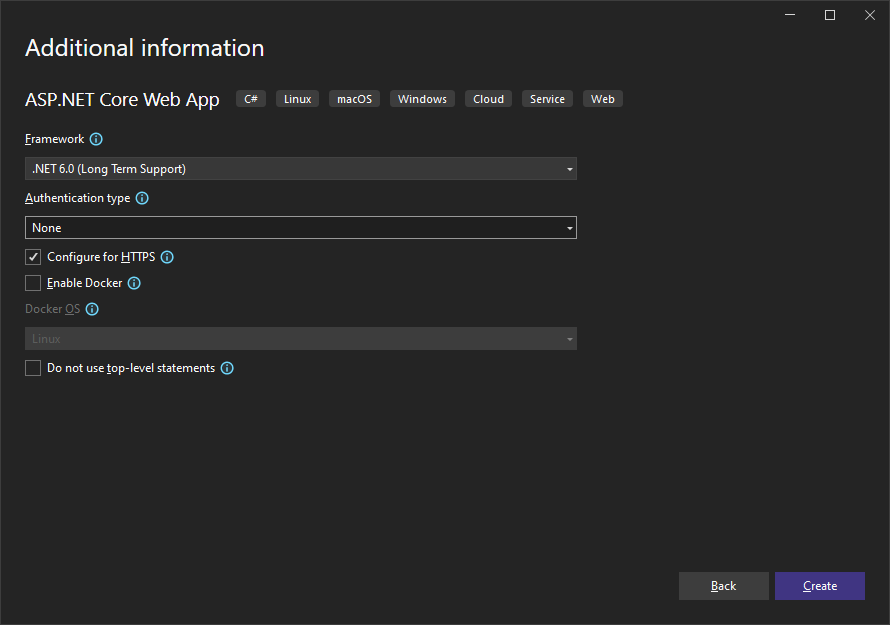
Select .NET 6 or higher for the Framework option and press Create:
Name the project my-riotblossom-app and press Next!
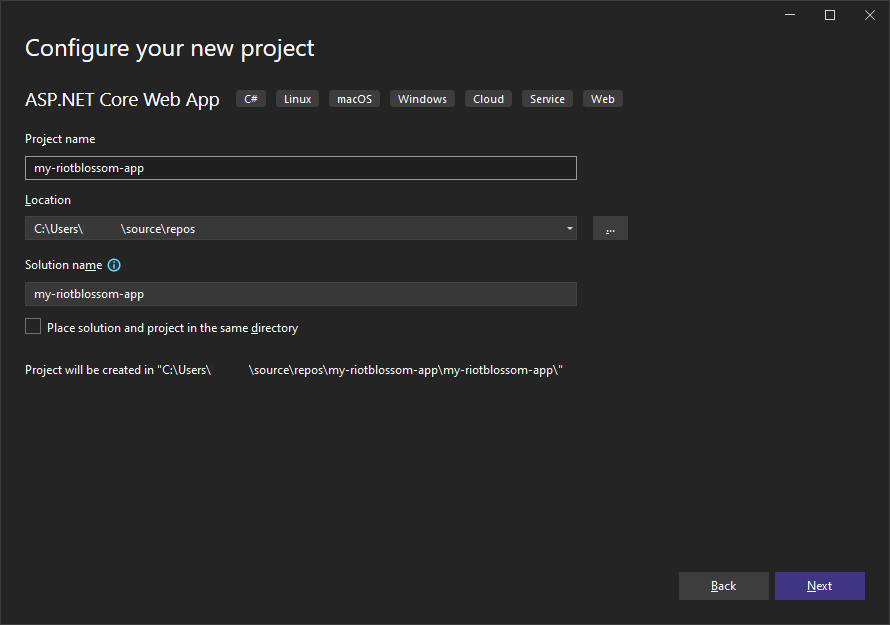
The ASP.NET Core project template will be created with the necessary files needed for a web application! :3
Setup RiotBlossom
We will first need to add RiotBlossom to the project Dependencies.
Under Solution Explorer on the right-hand side, right-click on the Dependencies folder icon and select Manage NuGet Packages.
In the NuGet Package Manager window, search for BlossomiShymae.RiotBlossom and install
the latest version:
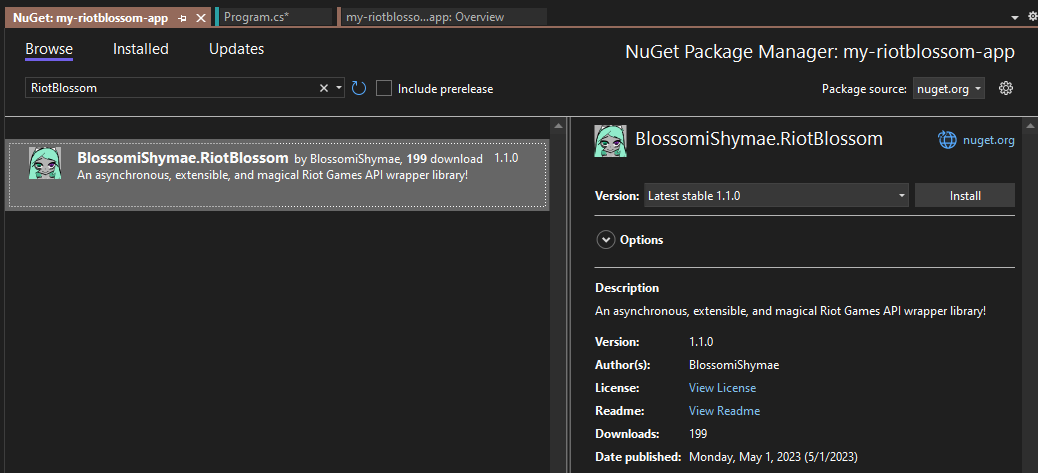
With the package installed as a dependency, we should now be able to proceed with configuring the services needed!
Configuring services with dependency injection
Modify and save the following code below to Program.cs:
using BlossomiShymae.RiotBlossom.Core;
using BlossomiShymae.RiotBlossom.Middleware;
using BlossomiShymae.RiotBlossom.Type;
using my_riotblossom_app.Converters;

var builder = WebApplication.CreateBuilder(args);

// Add services to the container.
builder.Services.AddRazorPages();

// ADD the following lines below
builder.Services.AddHttpClient();
builder.Services.AddSingleton<IRiotBlossomClient>(p =>
{
    IHttpClientFactory factory = p.GetRequiredService<IHttpClientFactory>();
    HttpClient client = factory.CreateClient();
    client.Timeout = TimeSpan.FromSeconds(5);
    string key = Environment.GetEnvironmentVariable("RIOT_API_KEY")
        ?? throw new NullReferenceException("RIOT_API_KEY is not set!");
    return RiotBlossomCore.CreateClientBuilder()
        .AddHttpClient(client)
        .AddRiotApiKey(key)
        .AddRiotMiddlewareStack(new MiddlewareStack(true, "rb-riot-cache"))
        .AddDataMiddlewareStack(new MiddlewareStack(false, "rb-data-cache"))
        .Build();
});
// END

var app = builder.Build();

// Configure the HTTP request pipeline.
if (!app.Environment.IsDevelopment())
{
    app.UseExceptionHandler("/Error");
    // The default HSTS value is 30 days. You may want to change this for production scenarios, see https://aka.ms/aspnetcore-hsts.
    app.UseHsts();
}

app.UseHttpsRedirection();
app.UseStaticFiles();

app.UseRouting();

app.UseAuthorization();

app.MapRazorPages();

app.Run();The following line below is used to add a RiotBlossom instance of the type IRiotBlossomClient to IServiceCollection. We used AddSingleton since we need only one instance throughout the lifetime of our web application.
builder.services.AddSingleton<IRiotBlossomClient>(p => {});What we are doing is registering an instance of IRiotBlossomClient as a service for dependency injection. We can inject/pass this service through the constructor of anything hooked to IServiceCollection e.g. controllers, Razor pages, services, and more!
That should be it with configuring services with dependency injection!
Edit a Razor page
For Page/Index.cshtml, modify and save the code
below:
@page
@model IndexModel
@{
    ViewData["Title"] = "Home page";
}

<div class="text-center">
    <h1 class="display-4">Welcome</h1>
    <p>Learn about <a href="https://docs.microsoft.com/aspnet/core">building Web apps with ASP.NET Core</a>.</p>
</div>

<form action="/summoner"  method="get" class="row g-3 align-items-center justify-content-center">
    <div class="col-auto">
        <input type="search" name="summonerName" />
    </div>
    <div class="col-auto">
        <button type="submit" class="btn btn-primary">Search</button>
    </div>
    <div class="d-flex flex-wrap justify-content-between align-content-around">
        @foreach (PlatformViewModel platform in Model.Platforms)
        {
            <input type="radio" class="btn-check" name="platformId" id="@platform.Id" value="@platform.Id" autocomplete="off" @(platform.Id.Equals("na1") ? "checked" : string.Empty) />
            <label class="btn btn-outline-secondary mb-1" for="@platform.Id"> @platform.Abbreviation </label>
        }
    </div>
</form>When pressing the Search button, the form will totes make a web request to /summoner with query parameter values for summonerName and platformId!
So something like this:
'GET /summoner?summonerName=uwuie%20time&platformId=na1 HTTP/1.1'For Page/Index.cshtml.cs, modify and save the code below:
using BlossomiShymae.RiotBlossom.Core;
using BlossomiShymae.RiotBlossom.Extensions;
using BlossomiShymae.RiotBlossom.Type;
using Microsoft.AspNetCore.Mvc.RazorPages;

namespace my_riotblossom_app.Pages
{
    public record PlatformViewModel
    {
        public string Abbreviation { get; set; } = default!;
        public string Id { get; set; } = default!;
    }

    public class IndexModel : PageModel
    {
        private readonly ILogger<IndexModel> _logger;
        public List<PlatformViewModel> Platforms { get; }

        public IndexModel(ILogger<IndexModel> logger)
        {
            _logger = logger;
            Platforms = Enum.GetValues(typeof(Platform))
                .Cast<Platform>()
                .Select(p => new PlatformViewModel
                {
                    Abbreviation = p.GetAbbreviation(),
                    Id = p.GetId()
                })
                .ToList();
        }

        public void OnGet()
        {
        }
    }
}Now we need to set up a Summoner page that receives our form GET submission for
/summoner!
Fetching data from summoner-v4
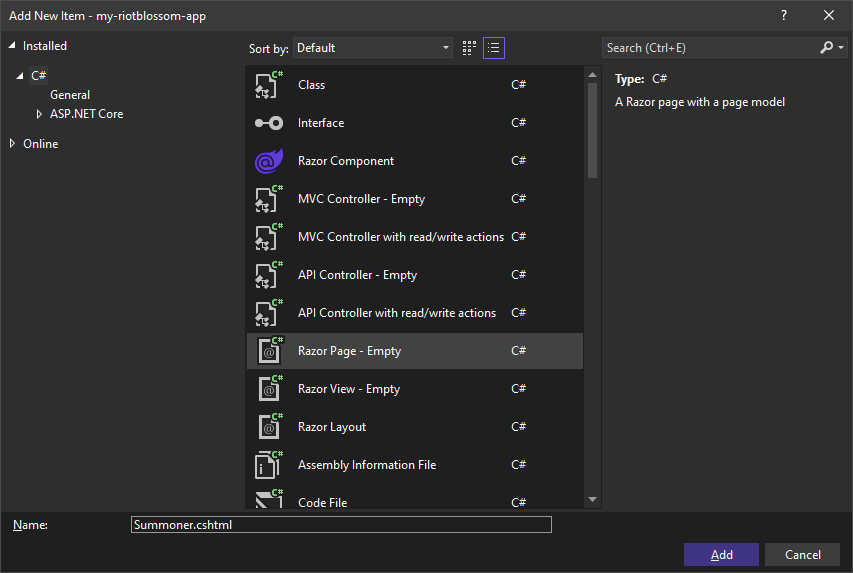
To set up a summoner page for receiving form data, we will need a new Razor page.
To create a new one, right-click on Pages and Add > Razor Page.
For the Select Scaffolded Item window, select Add Razor Page - Empty and continue.
Name the page Summoner.cshtml and click Add:
Now modify and save the following code for Summoner.cshtml and Summoner.cshtml.cs:
@page
@model my_riotblossom_app.Pages.SummonerModel
@{
    ViewData["Title"] = Model.ViewModel.Name;
}

<div class="card mb-3" style="max-width: 320px;">
    <div class="row g-0">
        <div class="col-auto">
            <div class="card border-0">
                <img src="@Model.ViewModel.ProfileIconUrl" class="img-fluid" style="max-width: 100px;" />
                <div class="card-img-overlay p-1 d-flex align-items-end justify-content-center">
                    <span class="card-text badge rounded-pill bg-dark text-light">@Model.ViewModel.Level</span>
                </div>
            </div>
        </div>
        <div class="col-auto">
            <div class="card-body">
                <h5 class="card-title">@Model.ViewModel.Name</h5>
                <span class="badge rounded-pill bg-secondary text-light">@Model.ViewModel.Platform</span>
            </div>
        </div>
    </div>
</div>using BlossomiShymae.RiotBlossom.Api;
using BlossomiShymae.RiotBlossom.Api.Riot;
using BlossomiShymae.RiotBlossom.Core;
using BlossomiShymae.RiotBlossom.Extensions;
using BlossomiShymae.RiotBlossom.Type;
using Microsoft.AspNetCore.Mvc;
using Microsoft.AspNetCore.Mvc.RazorPages;
namespace my_riotblossom_app.Pages
{
public record SummonerViewModel
{
public string Name { get; set; } = default!;
public string ProfileIconUrl { get; set; } = default!;
public long Level { get; set; }
public string Platform { get; set; } = default!;
}
public class SummonerModel : PageModel
{
private readonly ILogger<SummonerModel> _logger;
private readonly ISummonerApi _summonerApi;
private readonly IDataDragonApi _dataDragonApi;
public SummonerViewModel ViewModel { get; set; } = new();
public SummonerModel(ILogger<SummonerModel> logger, IRiotBlossomClient client)
{
_logger = logger;
_summonerApi = client.Riot.Summoner;
_dataDragonApi = client.DataDragon;
}
[BindProperty(SupportsGet = true)]
public string SummonerName { get; set; } = default!;
[BindProperty(SupportsGet = true)]
public string PlatformId { get; set; } = default!;
public async Task<IActionResult> OnGetAsync()
{
if (!ModelState.IsValid)
return Redirect("/");
try
{
var platform = PlatformMapper.FromId(PlatformId);
var summoner = await _summonerApi.GetByNameAsync(PlatformMapper.FromId(PlatformId), SummonerName);
var version = await _dataDragonApi.GetLatestVersionAsync();
_logger.LogInformation("Received summoner, {summoner}", summoner);
ViewModel = new()
{
Name = summoner.Name,
Level = summoner.SummonerLevel,
ProfileIconUrl = $"https://ddragon.leagueoflegends.com/cdn/{version}/img/profileicon/{summoner.ProfileIconId}.png",
Platform = platform.GetAbbreviation()
};
}
catch (Exception ex)
{
_logger.LogError(ex, "Request failed for summoner, {tuple}", (SummonerName, PlatformId));
return StatusCode(500);
}
return Page();
}
}
}Whew. Now that we are able to fetch a summoner, let us run the app we made! <3
Run the app
Go ahead and press the Start Debugging button or press F5 to run the server app.
The following web page should be displayed:
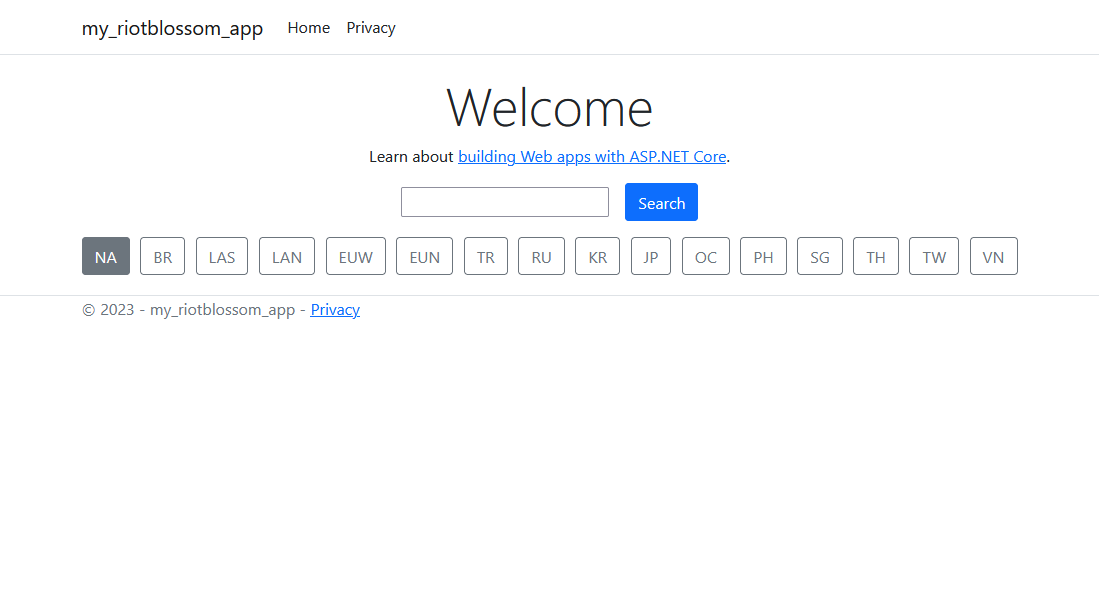
Test the summoner search form by typing in uwuie time with the region set to NA and pressing enter or clicking on search.
We should be able to get a minimal functioning summoner page similar to the one below!
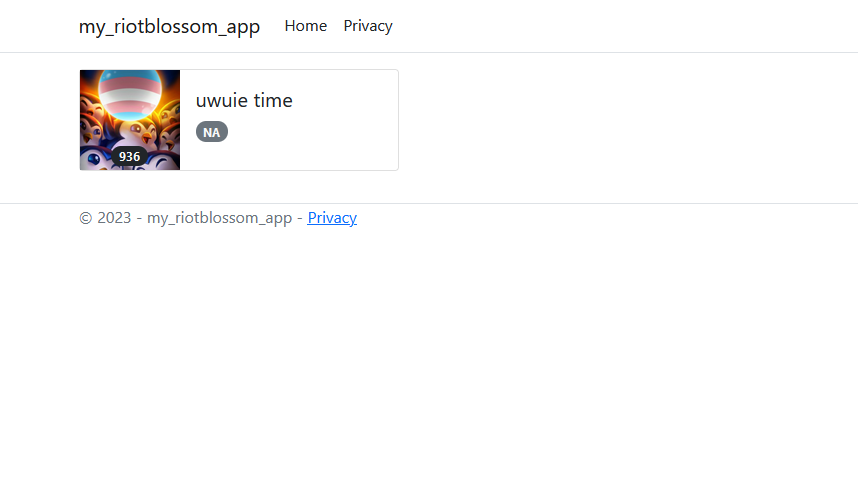
This web application is far from perfect and can be improved! This for example:
/summoner?summonerName=uwuie%20time&platformId=na1/summoner/na1/uwuie%20timeYay! If you made it this far, thank you very much for completing this tutorial!
You just learned how to get started with RiotBlossom in an ASP.NET Core web application!